30 May 2009

Everything up for sale in my shop!!!!

Spring Rainbow Bead Set - £18
Sand Storms Bead Set - £12.50
Forgotten Dreams Bead Set - £45
Lillyela Bead Set - £18
Tea Party Bead Set - £21
Mystery Key Bead Set - £15
Bottle Green Daisies Bead Set - £18
Black Polka Dots Bead Set - £15

You will find these on my website in my shop, or in my etsy shop along with some others! Please contact me if you have any questions.
Hope you all have a lovely sunny Saturday... for me ... it is time to go to work!!!
xxx

25 May 2009

Get Proffesional Looking Photos For Free With Gimp!!!

Right, well I few people have asked me recently how I get my photos looking so slick and clean. Well, to tell you the truth, it has taken alot of trial and error... but I am hoping that this tutorial will cut that "trial and error" stage out for you guys... and take you striaght to the proffesional looking stage!!!

Firstly, as you all know, Adobe Photoshop can be quite expensive... and sometimes we just don't have that spare money to pay out...! This
does not mean that you can't have good professional looking photos!!! I discovered Gimp when I bought a new mac laptop (which my original version of photoshop didn't work with), I had been moaning for a few weeks about not having photoshop becuase I had always resized my photos in there (that's actually all I used it for (how embarressing!)) and my dad sugessted I looked at this free download he had heard of off the internet called "Gimp" - meant to be a similar sort of program to photoshop... only free. Well... as we all know if something has a large price tag on it... we automatically think "Well... that must be good then" (or at least I did). So when my dad had mentioned it... I shrugged it off thinking "nope, nothing can be as good as photoshop". When he finally managed to persuade me to download it and have a look... I actually picked it up quite quickly... and could do more with this Gimp in the first couple of days than I'd actually taken the time to learn using photoshop! So I was pretty impressed!!!

Right, better get on with this tutorial and stop waffleing (sorry!)


Downloading Gimp For Your Computer

GIMP is the GNU Image Manipulation Program. It is a freely distributed piece of software for such tasks as photo retouching, image composition and image authoring. It works on many operating systems, and in many languages.

Click here to Download for Windows

Click here to Download for Mac OS X


Literally follow the on screen instructions and you should be have no problem with the download!!!

Taking The "Right" Photo

Like I said before I have tried and tested quite a few ways to take photos, some working well and some not so well... This tutorial is about how to photograph lampwork beads on a white background (but for that matter... as long as you want a white background... it doesn't matter what you're
photographing!!!) One thing I have leaned is if you really want to produce a clean perfect white background you MUST take your photos outside! I had been trying for months to take clean photos using artificail light inside but could never achieve the clean background I wanted because I always got a dark grey shadow in the corner... or if I took the picture from the same level and the item was placed... I would get a very dark grey background behind and above the beads.

So right... lets start with taking the photo outside. I have a A2 piece of white card which I use to photograph my beads on. You need to place the card on a level surface. (obviously if it raining... you don't want to take photos of your beads... wait til it stops raining! As long as its day time, even if its overcast, you will still get an even reflection off the sun onto the white card.) So take a picture, it doesn't really matter too much what camera you are using... if you have a white balance operation on your camera have a play around with that. I usually have mine set between 0.0 and +0.7. But it really doesn't matter because the white balance is what we are going to change using Gimp.


Click to enlarge photos


Leaning How To Use Gimp

First things first, you need the open Gimp up and either open the file you wish to edit or you can literally drag and drop the file into Gimp. Now, you can see I need to use the crop tool to get rid of my lovely garden furnature in the background.


You need to go into the Tools menu, then Transform Tools and Selecet Crop (or when you get used to using Gimp, the shortcut is Shift + C), take the time to make sure the image you a editing (the beads) sit centrally after you have finished cropping.


Below is a picture I took of the same bead set INSIDE... the overall background isn't the same shade so when you follow these steps the bead set ends up going to bright white so you can't see any detail... so if your photo looks like the following photo... take your card and beads outside and START AGAIN! :-)


The next step is to try and make that background as white as possible whilst not taking any of the colour out the beads.


You need to go into the Colour Menu and Select Levels, this menu will appear:


Right, now you need to click on the right colour picker that i've selected in blue, then once you have selected that (which is the white balance control) you need to click on the darkest part of the background (appart from the shadow of the item) i've selected in blue to show you where I would click.

Literally one click of the white balance colour picker will do, and you should get an image looking silimar to this So we have acheived the white background that we wanted but a little bit of the colour has washed out of the beads... so all we need to do is put that colour back in! My first step would be to make the colours a little brighter and more colourful (when editing your photos.. try and sit with the beads you are editing because you don't ever want to create a fulse representaion of your beads.) to do this I use the Hue-Saturation tool.


You need to go into the Colour menu, and select Hue-Saturation. I alway bring the saturtion of the picture up a little to bring out the true colours in the beads. (Whilst editing your beads you won't need to touch any of the other settings but if you have a spare 2 mins, the other settings change the whole colour of your photo... great fun!)


I have moved the saturation bar up from 0 to 41 there isn't any real noticeable difference apart from i've pulled the colour out a little. This does change though... so have a play with what you think works best.
Nearly finished, this is your last step!

You need to go into the Colour Menu, and select Curves, buy this point your background should be beautiful white, so you can leave the top half of the curve alown. I literally just pull from the bottom 1/4 or 1/3 down slightly, and the colour is instantly restored in the beads.

You should get perfect results...

And there you go! If you have any problem... you can contact me. But fingers crossed it will work for you!!!! :-D

15 May 2009

What I've been up to...

Right, well where do I start.. I've been a little quiet really on every front... I have been off work for a week with a pretty bad back.... and as a waitress ... having a bad back pretty much rights you off!!! I went back today did a 5 hour shift and its was ok... just can't afford to have any more time off!!! I'm saving up for a kiln, I'm taking this bead making very seriously cuz I enjoy it so so so so much, and I seem to be getting some where with it... So I tried to use my time off work wisely. I have set up a website for my beads which you can check out here. I have also set up an Etsy Store for my beads which you can view here. If you would like to see up to date pictures of what I have been making also you can look here at my flickr album. I spent two day "practicing" making straight lines with glass on my beads.... if I'm being honest it got better but not consistent by any means!!!! So that was a it disheartening BUT... the next day... when I thought I should stick to what i know I'm good at... to save up for that kiln!!!! This lovely bead set came out!!!!
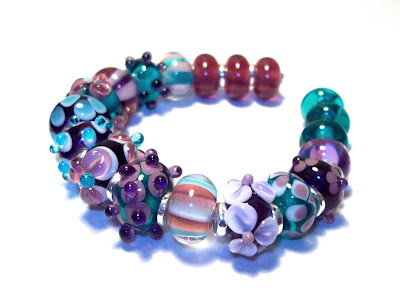
I am so so proud of this set... I love it!!!! It's so bad though... I want to keep it... hehe. I won't though!!! I need that kiln!!!!!!!!!!!! Anyway. I'm in work allllllll day tomorrow but I will try keep updated more than I have been !!!!!!!! TTFN xxx

4 May 2009

So today I have had yet another day off from being a waitress and behind the torch...


Well this bead was an experiment ... out of Sarah Hornick's ebooks, "Think Pink" and "11 things to do with Goldstone" I does have a crack in it... but im so proud I had to picture it!!!

Another Experiment... The right half have a light pink base and the left half have a purple base... all encased in different transparent pinks and purples... to see what different shades of pinks and purples :-D

The two sets above... I can't get the pictures to do the beads justice... they are retro-y
Love em!!!! Now I just need to get me a beady web site set up!!!!!!
Night All!!! xxx